Simulasi Proteus Arduino-LCD 16x2
Simulasi Arduino-LCD 16x2 Proteus
Simulasi Proteus Arduino-LCD 16x2. LCD 16x2 merupakan perangkat penampil yang sering digunakan dalam project arduino. Hal ini dikarenakan penggunaannya yang simpel, mudah dan cepat. Dipasaran banyak modul LCD ini yang dijual dalam bentuk Shield ataupun secara mandiri. Pada kesempatan ini kita akan melakukan simulasi penggunaan LCD 16x2 ini pada software proteus ISIS 8. Ok, just get started!
Peralatan:
1. Arduino IDE
2. Proteus 8
Langkah-langkah:
- Pastikan telah mengistall library arduino pada Proteus. Bila belum, cara istalasi dapat dilihat dan dipelajari here!
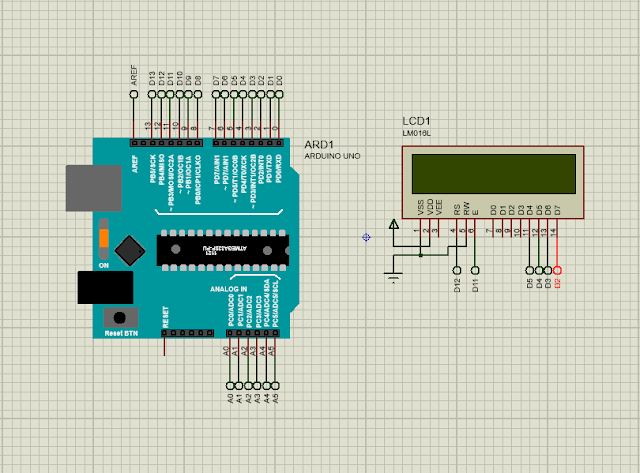
- Buka Proteus dan siapkan komponen serta susun konektor seperti dibawah ini:
- Buka arduino IDE dan buka contoh program LCD(File > Examples > LiquidCrystal > pilih bebas)
- Dalam program dapat dilihat konfigurasi pin LCDnya. Pastikan konfigurasi tersebut sesuai dengan pin pada Proteus. Contoh: RS pin ke digital pin 12, LCD Enable pin ke digital pin 11, LCD D4 pin ke digital pin 5, LCD D5 pin ke digital pin 4, LCD D6 pin ke digital pin 3, LCD D7 pin ke digital pin 2.
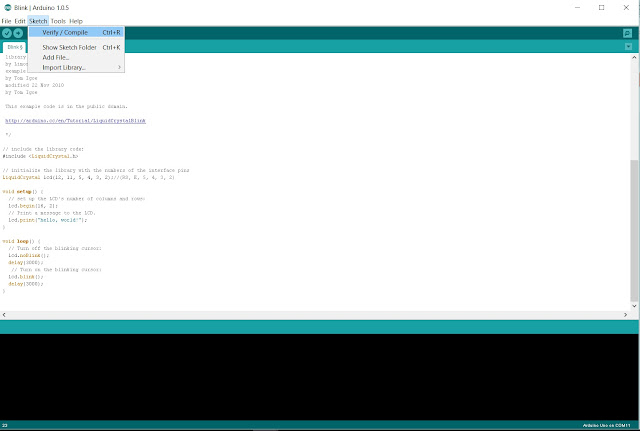
- Bila sudah sesuai pilih Compile/verify (tombol Check list atau Sketch > Verify/Compile)
- Setelah program sukses di compile maka akan didapatkan file dengan eksensi .hex . Nah file inilah yang akan kita gunakan untuk menjalankan arduino di Proteus. Cari lokasi file .hex hasil proses Compile (biasanya agak paling bawah).
- Block dan copy lokasi direktori dari file .hex tersebut (Ctrl+C) selanjutnya paste pada arduino di Proteus (doubel klik arduino => paste pada program file).
- Jalankan Simulasi dan sistem akan beroperasi.
Lakukan percobaan pada code arduino untuk memahami fungsi-fungsi /perintah dari penggunaan program LCD. Sebagai contoh ada program dibawah ini. Copy -Paste-Compile-dan Simulasikan. Just Simple..
// include the library code:
#include <LiquidCrystal.h>
// initialize the library with the numbers of the interface pins
LiquidCrystal lcd(12, 11, 5, 4, 3, 2);// RS, E, DB4, DB5, DB6, DB7
void setup() {
// set up the LCD's number of columns and rows:
lcd.begin(16, 2);
}
void loop() {
// set the cursor to (0,0):
lcd.setCursor(0, 0);
// print from 0 to 9:
for (int thisChar = 0; thisChar < 10; thisChar++) {
lcd.print(thisChar);
delay(500);
}
// set the cursor to (16,1):
lcd.setCursor(16, 1);
// set the display to automatically scroll:
lcd.autoscroll();
// print from 0 to 9:
for (int thisChar = 0; thisChar < 10; thisChar++) {
lcd.print(thisChar);
delay(500);
}
// turn off automatic scrolling
lcd.noAutoscroll();
// clear screen for the next loop:
lcd.clear();
}
Download Proteus File
Pencarian Terkait:


Gabung dalam percakapan