ESP32 - LCD 16x2 dengan komunikasi I2C
LCD 16×2 ini memiliki 16 Kolom dan 2 Baris. Ada banyak kombinasi yang tersedia seperti, 8×1, 8×2, 10×2, 16×1, dll. Tetapi yang paling banyak digunakan adalah LCD 16 × 2. Jadi, totalnya (16×2=32) 32 karakter dan masing-masing karakter terdiri dari 5×8 Pixel Dots. Dari sekian banyak ukuran display, ukuran 16x2 merupakan yang sering digunakan pada project embedded dan lain sebagainya. Hal lain yang tak kalah penting untuk deperhatikan adalah type IC interface pada LCD tersebut. Kebanyakan LCD 16x2 menggunakan Interface IC HD44780. Display ini memungkinkan untuk di kontrol dengan menggunakan komunikasi I2C. Salah satu keuntungannya adalah menghemat pin I/O. Apabila kita menggunakan data bus paralel (db4-db7) maka memerlukan 4 pin I/O, sedangkan dengan I2C kita hanya memerlukan 2 pin (SDA & SCL). Diperlukan modul tambahan yaitu I2C IIC Module LCD Serial Adapter. Modul ini Support untuk LCD ukuran 16x2 dan 20x4.
1. Wiring
Untuk wiring cukup mudah. Hubungkan pin power ke 5V (VIN), pin SDA ke D21, dan SCL ke D22.
2. Program
Sebelum memulai, instalasi terlebih dahulu library untuk modul I2C ini. Library yang digunakan adalah LiquidCrystal I2C by Marco Schwartz
Setelah instalasi library, bisa lanjut dicoba code dibawah untuk uji coba dan memahami fungsi. Fungsi dari library ini tidak jauh berbeda dengan library LCD bawaan arduino, sehingga cukup mudah di pahami.
#include <Wire.h>
#include <LiquidCrystal_I2C.h>

// Set the LCD address to 0x27 for a 16 chars and 2 line display
LiquidCrystal_I2C lcd(0x27, 16, 2);

void setup(){
 // initialize the LCD
 lcd.begin();
 lcd.print("Hello, world!");
  delay(2000);
}

void loop(){
  lcd.clear();
  delay(2000);
 lcd.setCursor(0,0);
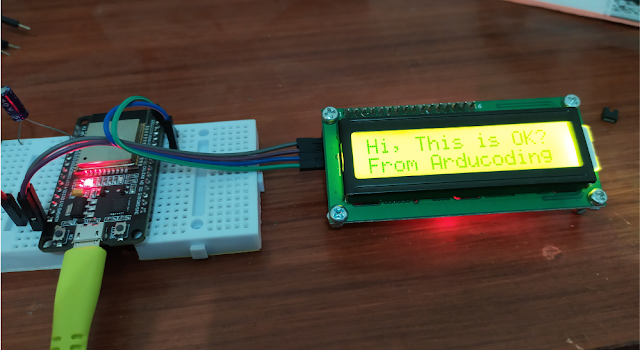
  lcd.print("Hi, This is OK?");
  delay(2000);
  lcd.setCursor(0,1);
  lcd.print("From Arducoding");
  delay(5000);
}
 |
| Hasil Program |
Implementasi
Sebagai contoh dari penggunaan metode ini (LCD I2C), mari kita coba menggabungkannya dengan sensor DHT 22. REQUIRES the following Arduino libraries (silahkan install terlebihdahulu library berikut):
- DHT Sensor Library: https://github.com/adafruit/DHT-sensor-library
- Adafruit Unified Sensor Lib: https://github.com/adafruit/Adafruit_Sensor
#include <Wire.h>
#include <LiquidCrystal_I2C.h>
#include "DHT.h"

#define DHTPIN 5     // Digital pin connected to the DHT sensor
#define DHTTYPE DHT22   // DHT 22  (AM2302), AM2321

// Set the LCD address to 0x27 for a 16 chars and 2 line display
LiquidCrystal_I2C lcd(0x27, 16, 2);
DHT dht(DHTPIN, DHTTYPE);

void setup() {
  Serial.begin(115200);
  Serial.println(F("DHTxx test!"));
  dht.begin();
  lcd.begin();

  //intro gak penting
  lcd.setCursor(0,0);
  lcd.print("   Temperature");
  lcd.setCursor(0,1);
  lcd.print("     Monitor");
  delay(2000);
  lcd.clear();
}

void loop() {
  // Wait a few seconds between measurements.
  delay(1000);
  // Reading temperature or humidity takes about 250 milliseconds!
  // Sensor readings may also be up to 2 seconds 'old' (its a very slow sensor)
  float h = dht.readHumidity();
  // Read temperature as Celsius (the default)
  float t = dht.readTemperature();
  // Read temperature as Fahrenheit (isFahrenheit = true)
  float f = dht.readTemperature(true);

  // Check if any reads failed and exit early (to try again).
  if (isnan(h) || isnan(t) || isnan(f)) {
    Serial.println(F("Failed to read from DHT sensor!"));
    lcd.setCursor(0,0);  lcd.print("No Sensor!");
    return;
  }

  // Compute heat index in Fahrenheit (the default)
  float hif = dht.computeHeatIndex(f, h);
  // Compute heat index in Celsius (isFahreheit = false)
  float hic = dht.computeHeatIndex(t, h, false);

  Serial.print(F("Humidity: "));
  Serial.print(h);
  Serial.print(F("%  Temperature: "));
  Serial.print(t);
  Serial.print(F("°C "));
  Serial.print(f);
  Serial.print(F("°F  Heat index: "));
  Serial.print(hic);
  Serial.print(F("°C "));
  Serial.print(hif);
  Serial.println(F("°F"));

  //Display data ke LCD =>tampung di data string
  String print_temp = "Temp: ";  print_temp += String(t); print_temp += " C";
  String print_humd = "Humd: ";  print_humd += String(h); print_humd += " %";
  lcd.setCursor(0,0);  lcd.print(print_temp);
  lcd.setCursor(0,1);  lcd.print(print_humd);

}


2 komentar